

Are you unable to extend volume of your primary partition because “Extend Volume” is greyed out? You may want to expand volume of your C drive. But we understand it can annoy the hell out when you are unable to do so, especially when your primary partition is running out of space. So, why is extend volume greyed out, and how to fix it? Scroll down to find the answer!
NOTE: The Disk Management “Extend Volume” can be greyed out in various situations and its resolution depends on these situations.
Scenario 1: “Extend Volume” Greyed Out When There’s Unallocated Space
Quite often than not “Extend Volume” is greyed out in Windows 10/11 because of no “unallocated space” on your disk. This space needs to be right next to volume you want to extend.
So, if you have a partition you wish to extend, you may need to shrink or delete partition next to it to create necessary unallocated space. Follow instructions below to do just that:
Fix 1.1. Shrink Volume to Create Unallocated Space
Step 1: Transfer data from target partition to another volume to avoid data loss.
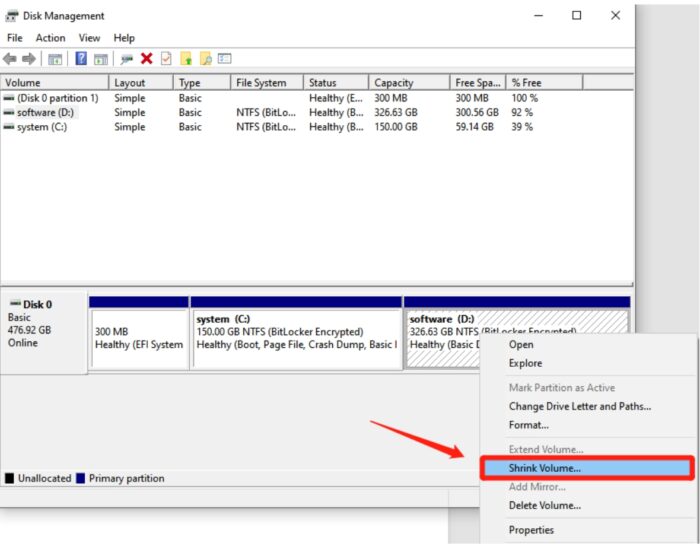
Step 2: Right-click Windows Start menu and choose “Disk Management.”
Step 3: Right-click adjacent partition and select “Shrink Volume.”
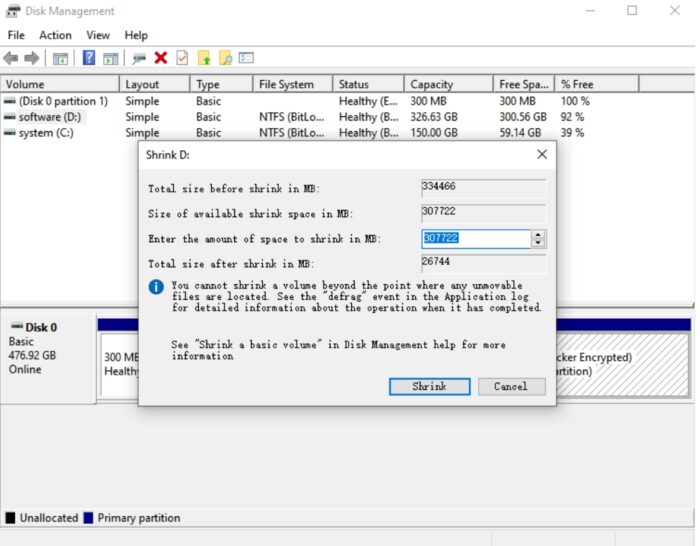
Step 4: Specify shrink amount and confirm. This will fix “Extend Volume” greyed out Windows 10/11. Afterward, you can expand the intended partition.
Fix 1.2. Delete Volume to Create Unallocated Space
Step 1: Right-click Windows Start menu and choose “Disk Management.”
Step 2: Right-click adjacent partition in “Disk Management” and click “Delete Volume.” Hit “Yes.”
The Disk Management “Extend Volume” won’t be greyed-out anymore and partition will now appear as unallocated space. You can then easily extend volume to left side of this unallocated space.
Scenario 2: “Extend Volume” Greyed Out Even With Unallocated Space
When an unallocated space is not right next to target partition you’ll get “Extend Volume” greyed out even with unallocated space. This is because simply using “Shrink Volume” option on adjacent partition won’t work if it’s between partition you want to extend and unallocated space.
Therefore, you can delete adjacent partition with Diskpart Utility. Or if you want to avoid manual steps, choose a third-party tool like 4DDiG Partition Manager to fix “Extend Volume” greyed out even with unallocated space:
Fix 2.1. Add Unallocated Space With 4DDiG Partition Manager
You can add unallocated space with help of 4DDiG Partition Manager. It offers a one-click operation to resolve “Extend Volume” greyed out Windows 10/11. It can extend volume by merging it with unallocated space and other partitions even if they are not next to each other. Check out its amazing features below:
- Create, merge, split, resize, shrink, delete, format, and move partitions.
- Repair, restore, and recover partitions.
- Extend volume without data loss.
- Convert MBR to GPT for Windows 11.
- Clone entire disk to backup data.
- Move OS to SSD disks without installation.
Here’s how to use this tool to add unallocated space:
Step 1: Download, install and open partition manager tool on PC and choose “Partition Management.”
Step 2: Right-click on partition to extend and select “Resize/Move.” In popup, adjust partition size by dragging its borders or entering a specific size in GB.


Step 4: Click “Execute 1 Task(s),” and press “OK.” The resizing process begins. Once done, click Done to complete the partition size adjustment.

Fix 2.2. Delete the Partition With CMD
Step 1: Create a bootable Windows disk to safeguard against losing data from partition deletion.
Step 2: Type in “CMD” in Windows search bar, and right-click on it to run as admin.

Step 3: Enter “diskpart” to open DiskPart Utility and type in “list disk” to see list of all disks.
Step 4: Choose disk (with partition which you wish to delete). Enter “select disk [number]” (replace [number] with disk number).
Step 5: View all partitions with “list partition.”

Step 6: Select partition which you wish to delete with “select partition [number]” and (replace [number] with its partition number).
Step 7: Delete partition with “delete partition override” and resolve “Extend Volume” greyed out Windows 11/10.
Scenario 3: “Extend Volume” Greyed Out When Your File System Isn’t NTFS
You may encounter “Extend Volume” greyed out if your partition is FAT/exFAT or EXT. Due to Windows constraints you may not be able to extend partitions to NTFS format. To address this issue, convert the partition to NTFS using Disk Management, and then proceed with extending it with following steps:
Fix 3.1 : Convert Partition to NTFS Format
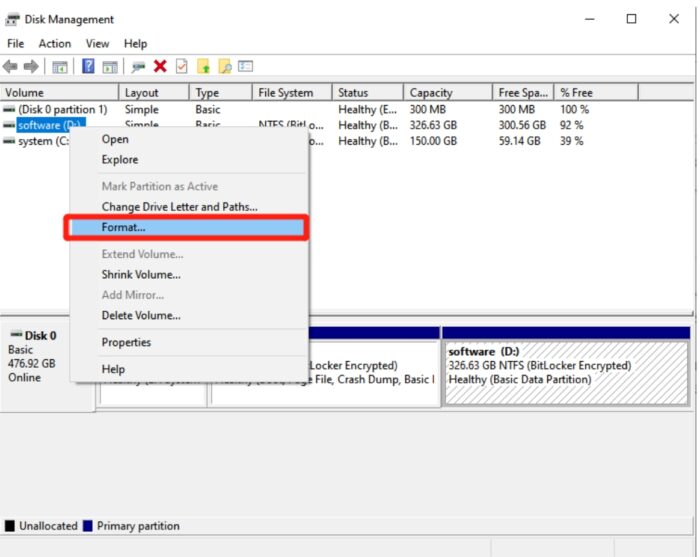
Step 1: Right-click on Windows Start menu and choose “Disk Management.”
Step 2: Right-click target drive, choose “Format,” set volume label, and select NTFS as file system.
Step 3: Right-click on same drive and check if “Extend Volume” option is now available. If it is, proceed to extend partition. Hopefully, this will resolve “Extend Volume” greyed out Windows 11/10 issue.
Scenario 4: “Extend Volume” Greyed Out When MBR Partition Reaches 2 TB
Sometimes, Disk Management “Extend Volume” can be greyed out in instances where disk operates on older MBR (Master Boot Record) partition. In such cases, you won’t be able to create a single volume exceeding 2TB because of limitations in MBR. If you come across this, convert the MBR to GPT with Disk Management. However, this method requires you to delete all partitions and volumes on disk. So, back up your drive first before converting it to GPT.
Fix 4.1 : Convert MBR to GPT Partition
Step 1: Right-click on Windows Start menu and choose “Disk Management.”
Step 2: To delete each partition or volume, right-click on it and pick “Delete Partition” or “Delete Volume.”
Step 3: Right-click on MBR disk, and select “Convert to GPT Disk.” This will fix “Extend Volume” greyed out Windows 11/10.
Disk Management Extend Volume Greyed Out FAQs
Q1: Why is “Extend Volume” greyed out?
The Disk Management “Extend Volume” can be greyed out due to the following reasons:
- No unallocated space on disk.
- Unallocated space is not next to target volume.
- The partition to extend isn’t in NTFS or ReFS format.
- The disk uses older MBR partitioning scheme.
Q2: How to extend C drive CMD?
To extend C drive with CMD follow the steps below:
Step 1: Type in “CMD” in Windows search bar, right click on Command Prompt, and open it with admin privileges.
Step 2: Type in “diskpart” and press “Enter” to open “Diskpart Utility.”
Step 3: Type in “list volume” and press “Enter.” This will display list of all available volumes where you can identify your C drive’s volume number.
Step 4: Type in “select volume [number].” Here replace [number] with volume number of your C drive and press “Enter.”
Step 5: Type in “extend size [number].” Here replace [number] in MB with how much you wish to extend C drive in size an press “Enter.”
Final Words
Generally, “Extend Volume” is greyed out because of limitations in Disk Management. As discussed throughout article, various scenarios may lead to this problem, and we’ve provided solutions for each.
However, for a hassle-free creation of unallocated space without manual complexities, we recommend using 4DDiG Partition Manager. This tool not only extends and moves partitions but also efficiently manages them. It also offers hard drive backup capabilities, so you won’t face data loss while extending partitions!


