

Life’s cacophonies often creep into our quiet moments, interrupting relaxation or concentration. Whether it’s the footfalls of a bustling household, the hum of a bustling city, or the echo of footsteps in an empty room, these sounds can be disconcerting. A solution? Enter the realm of sound mats. With the right approach, these installations can cocoon your living or workspace, offering a sanctuary of serenity.
Benefits
Sound mats, quite simply, are guardians of tranquility. They diminish vibrations and external noises, ensuring a calmer environment. Firstly, they provide acoustic comfort. When placed beneath flooring, they absorb sounds, making spaces more conversation-friendly and peaceful. Think about this: With an aptly positioned sound mat, a household can play music without disrupting a child’s study time in the next room.
Next, these mats are energy efficient. By acting as a barrier, they also offer insulation. Homes equipped with sound mats often require less heating or cooling, leading to savings in utility bills. This dual benefit – acoustic and thermal – makes them an investment worth considering. If this is something you can benefit from, call the Gypcrete contractor and have them do it for you.
Lastly, they extend the life of your flooring. By acting as a cushioning layer, these mats reduce wear and tear, ensuring that your floors remain pristine for a longer time. Whether hardwood or carpet, floors with a protective layer underneath tend to resist damage from foot traffic.
Choosing the Right Model
The market offers a myriad of choices when it comes to sound mats. Begin by understanding your needs. Are you trying to minimize airborne noises like voices? Or are you battling with impact sounds, like footfalls? The former requires mats made of denser materials while the latter needs cushioned solutions.
Density and thickness play pivotal roles. A thicker one typically offers better insulation against both airborne and impact noises. However, it’s crucial to strike a balance, as extremely thick mats can affect the integrity and aesthetics of your flooring.
Consider the type of flooring you intend to install over the mat. Different materials require different kinds of sound mats. For instance, a tile floor might need a mat that offers superior compression strength, while a wooden floor might benefit from one that provides excellent impact insulation.
Tools and Materials Needed
Preparation is the key to smooth sailing. Begin with acquiring the necessary tools. You’ll need a utility knife for precise cuts, a measuring tape to ascertain exact dimensions and chalk or markers for marking. Depending on your floor type, a trowel may be essential for spreading adhesive.
Your primary material? The sound mat, of course. Before purchasing, ensure it’s the correct size for your space. Overshooting can lead to wastage, while undershooting can disrupt the installation process.
Adhesive or double-sided tape will be necessary to affix the mat to your subfloor. Some mats come with a peel-and-stick design, eliminating the need for a separate adhesive. Remember to choose a high-quality adhesive; your mat’s efficacy hinges on its bond with the subfloor.

Preparing the Subfloor
Before embarking on the installation journey, ensure your subfloor is in impeccable condition. Start by cleaning it meticulously. Remove any debris, dust, or old adhesive residues. A pristine surface ensures that it adheres properly.
Ensure the subfloor is level. Uneven surfaces can undermine the effectiveness of the sound mat. If you spot any disparities, use a leveling compound to smooth things out. It’s a step that can’t be overlooked; a lumpy base can lead to long-term issues.
Lastly, ascertain the subfloor’s dryness. Wet or damp floors can be detrimental to the mat’s adhesion and efficacy. If there’s any moisture, ensure adequate drying before proceeding.
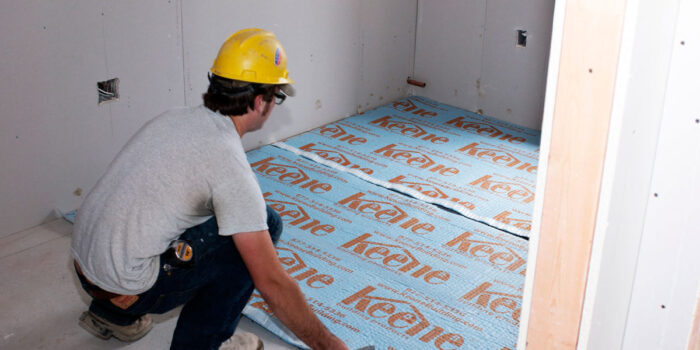
Installing the Sound Mat
Now to the main event. Start at the room’s furthest point, unrolling the sound mat towards the entrance. Ensure there are no ripples or bubbles; these imperfections can compromise the installation’s integrity.
Once laid out, it’s time to affix it. If your mat doesn’t come with an adhesive backing, apply a liberal amount of adhesive to the subfloor using a trowel. Lay it over the adhesive, pressing down to ensure a robust bond.
Trim excesses with a utility knife. Keep the cuts clean and precise, ensuring that adjoining mats (if you’re using more than one) align perfectly. Remember, gaps can undermine acoustic performance.

Sealing and Securing Edges
Edges, when left unattended, can become tripping hazards. They can also leave room for sound leakages. Start by ensuring the mats are snug against the walls. Trim any overhanging sections for a perfect fit.
Now, seal the edges. Use a high-quality sealing tape, pressing firmly to eliminate gaps. This step ensures that no sound seeps through the edges.
Lastly, use adhesive or double-sided tape at the mat’s perimeter. This ensures they remain firmly in place, even under heavy foot traffic.
Testing Sound Insulation
Post-installation, it’s time to evaluate your handiwork. Start by walking across the room. Listen for any echoes or footfall sounds. Ideally, there should be a noticeable reduction in noise.
Play some music or sounds at varying volumes and frequencies. Walk outside the room and listen for any leakage. The music should be significantly muted.
If any discrepancies arise, re-evaluate the installation. Ensure the mats are seamlessly aligned, and there are no gaps or bubbles.

Flooring Options for Sound Installation
The type of top flooring plays a role in the effectiveness of your sound mat. Carpets, with their plush nature, offer excellent sound absorption. When combined with a sound mat, they deliver top-tier acoustic performance.
Hardwood floors, with their natural elegance, are another favorite. However, they can be noisy. A sound mat underneath acts as a buffer, reducing noise substantially.
Tiles, especially in busy areas like kitchens or bathrooms, can be noisy. But with the right one, even these spaces can be havens of calm.
Final Thoughts
In a world of clamor and chaos, the search for serenity becomes paramount. Sound mat installation is more than just a functional choice; it’s a commitment to a quieter, more peaceful living space. Whether for work or relaxation, such an environment can make all the difference. So, take that step. Let serenity surround you.


