

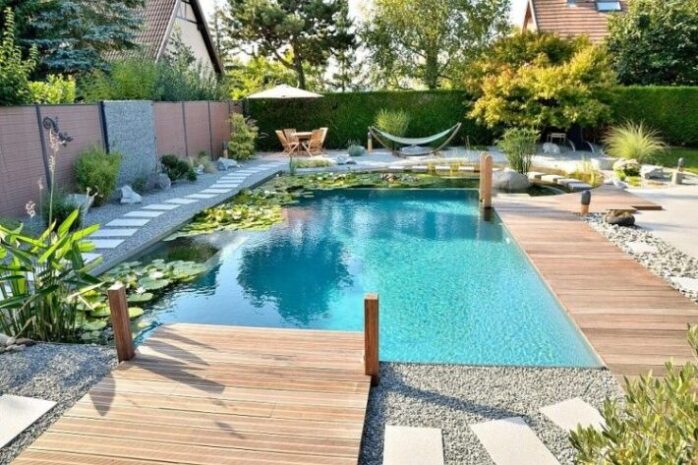
Have you ever wanted to build your very own natural pool in your backyard through DIY means?
If so do you even know where to start? Natural pools are getting more and more popular in households with large yards that can afford them. But not only that, this type of pooling is very aesthetically pleasing and something far from the ordinary.
This is exactly what makes it so popular and precisely the point why we’re here to tell you how to do it. If you’re becoming a fan of this type of pool, then this is the article for you.
Stick around as we’ll discuss the tips for building one and even touch on some key issues involving.
1. Dig the Hole

First things first we cannot have a pool without digging a hole for it. This is a fairly straightforward tip and you can either do it yourself or hire a construction crew to do it for you.
One thing you should have in mind is that a natural pool is a very affordable option for backyard entertainment and leisure. A natural pool can cost as little as $2,000 while we all know the costs for fiberglass, vinyl, or concrete swimming pools.
When first digging the hole, the depth should be taken into consideration. Another thing to have in mind is to dig a 1-feet vertical drop for every 3-feet of horizontal digging. This way you’re making sure that your pool has a nice slope that won’t cause the rest of the soil to cave in.
To make things clearer, the hole should resemble a soup bowl rather than a normal concrete pool we’re used to seeing. By creating a bowl-shape hole, you’re eliminating the traditional need of using steel as reinforcements to prevent unwanted caving.
2. Zoning
We mentioned that natural pools don’t use chemicals but they also don’t use chlorine. But since a pool requires these chemicals to prevent the formation of algae and other sorts of bacteria, you need to use something that will act as a substitute to chlorine.
Luckily for you, all-natural pool owners use shallow plants around the sides of the hole to act as chlorine substitutes. You should use a lot of these plants so you can be effective at it and experts even suggest you cover more than 50% of the surface area with them.
These plants also eliminate the need for filtering and pumping, effectively saving you thousands of dollars of essential equipment that Mother Nature provides.
However, no one wants to swim in plants and have them touch of backs and feet, so experts suggest you plant them in a separate area where you won’t be swimming there.
The plant zone will also be a perfect place where small animals and frogs can chill and breed. While the prospect of frogs in your pool might not excite you, it sure will when we say that these pools are perfect places for mosquitoes and other insects. And if there is anyone who can take care of this problem for you, it’s the frogs.
3. Filtration

The plant zone will take care of filtration through its own means. The plants in the plat zone use their roots to cleanse the water and the entire pool.
However, the plant zone needs oxygen to be effective at its job. So that’s why expert swimming pool builders at compassnewcastle.com.au suggest channeling a PVC tube into the soil around the depth of the roots of the plants to provide them with the necessary oxygen.
But that’s not all of it. You’ll need to use something that will send the oxygen to the roots of the plants, so a good option would be to connect a compressor to the tube or even a diffuser.
This way, the strong airflow will give the plants the much-needed oxygen to survive and be an effective filter to your pool.
4. Sealing

Once you’ve taken care of the filtering problem, it’s now time to seal off the entire pool.
Remember that we haven’t filled the hole with water since doing so will only create a puddle of mud. Before doing so, we need to seal off the hole and we suggest you apply a layer of bentonite clay. You can also apply a layer of synthetic liner, but the former is a cheaper option.
Bentonite works sort of like glue in a way that it glues together the soil and prevents water from seeping into the ground. Bentonite works best with soil types that have more clay in them and is very pool for sandy soil. This means that bentonite will not work for you in the case of dry soil.
But, if you want to be sure about it, make sure to talk to a local pond builder just in case you don’t know your soil type and how to best approach this issue.
If your soil type is dryer than moist, a layer of synthetic linen will work better. It is more expensive but it’s an excellent option for arid climates.
5. Other Sealing Options

Concrete, as it turns out, is an excellent sealing option if you prefer a more convenient shape. But not only that, the rastra block has proven to be a very good option in this case. Rastra block and concrete might be less eco-friendly than gravel or stone, but they work brilliantly with the plant zone in terms of filtration.
However, sealing off with concrete can be rather tricky and it requires you to hit the right mixture. So, unless you know your stuff, we suggest you hire experts to help you out on this one. No one wants their pool to look unbalanced since it will harm the aesthetics.
In the case of rastra blocks, do know that 10 feet long and up to 30 inches in height. This means that you need to make more space for yourself so you can apply the blocks without harming the depth of the pool.
For this to work, we suggest you dig another 30 inches to cover for the block’s own height.


